So, I realize it's been a very long while since I've updated this thing. So, how about if I do.
For lunch today. I decided that I needed to use up the extra piece of naan bread that we had in the fridge. So what did I do? I decided to caramelize some onions and garlic and cover it with cheese and pop it in the oven. Which was really good. So, here's the recipe!
What you need:
1 piece of naan bread ((I had the packaged stuff from Albertson's. I used the garlic flavor))
2 good sized cloves of garlic
1/4 of an white onion ((I suppose you could use red if you really wanted too))
Good handful of mozzarella cheese
EVOO to cook the onions and garlic in
Hardware:
Small sized pan
Wooden spoon or spatula
Cookie sheet
What to do:
1. Preheat the oven to the temp said on the back of the bread package ((In this case, it was 400 F))
2. Turn on the stove to low/medium-low and add a good amount of EVOO (Extra Virgin Olive Oil) into the pan
3. Cut up your onion and garlic and add it into the pan
4. Stir around and get the onions and garlic well coated.
5. Now comes the hard part: WAIT! Just let the onions and garlic do their thing, occasionally stirring them until they get all cooked down and nice and yummy and a pleasant brown color. Not burned though. It's just their sugars cooking out, making them sweet and tasty.
6. Once your onions and garlic have finished caramelizing, put them on your naan bread an cover with a good amount of cheese.
7. Pop it in the oven for 15 minutes, till the cheese gets nice and brown and the bread gets all crusty and crunchy.
8. Pull it out and let it cool for a few minutes.
9. Cut it up
10. ENJOY!
I didn't get any pictures of it. But trust me, it's GOOD!
Enjoy!
Till next time, Happy eating!
Friday, February 4, 2011
Saturday, August 14, 2010
Chicken and Pasta, Couldn't Be Better
So, it's been a long while since I've updated. My appologies. My computer crapped out on me and I haven't had a whole ton of chances to do cooking recently. So this is what I came up with the other day.
Chicken Penne Cordon Blue
Makes about 8 servings
What You Need:
1.15 lbs of Chicken Tender Breasts (I used the Tyson ones, use all of the package)
1 lb Penne
8 oz Italian Cheese Blend (I used Tilamook, but Kraft works just as well, or whatever the cheap brand is)
Ham/Pancetta/Bacon/Prosuito-2 or 3 slices of ham will do, I used Honey Ham
2 c of Milk
1/4 cup of Butter
1/4 cup of Flour (I used whole wheat because I was out of white, if it sits in the fridge for several days, it'll turn a funny color, the whole wheat flour I mean)
4 cloves of Garlic
Salt
Pepper
Fresh Basil
Onion Powder
Garlic Powder
Parsley
Freshly grated Nutmeg
2 tablespoons of Cream Cheese
EVOO to cook the chicken in
Things I didn't use but would probably be good in it:
1 small onion or 1/2 a medium sized onion
2 tablespoons Dijon Mustard
Pinch of Red Pepper Flakes
And I would definitely recommend using bread crumbs, but I didn't have any of bread crumbs to use.
What to do:
1. Cut and cook the chicken till it's done, and preheat the oven to 350
2. Boil the water
3. Cook pasta 6-8 minutes
4. Melt the butter and add the flour, and stir to make a paste (AKA: A roux)
5. Let the flour 'cook out' for a couple of minutes
6. Add the milk and let it thicken, stir the lumps out of the milk. Should only take a few minutes
7. Add the seasonings to the milk, the garlic powder, the onion powder, some salt and pepper, nutmeg, parsley, Basil (make sure it's fresh), the cream cheese, and the garlic(and if you were using these things) the mustard, red pepper flakes, and onion. (You could cook the garlic and onion first, till they're translucent)
8. Add 1/2 the cheese into the mixture, and stir till it's smooth and incoorperated
9. Crisp the ham in a pan
10. Mix the chicken with the pasta, and put in a baking dish, put a layer of plain pasta down, and a little bit of chicken, put just a little bit of sauce on the pasta, and a little bit of ham, then layer the rest of the chicken/pasta mixture, and the sauce. Then sprinkle the rest of the cheese and the ham, and if you have breadcrumbs, sprinkle them up on top here.
11. Bake for 20 minutes
12. Remove and let cool for a little bit
13. Enjoy!
And that's Chicken Penne Cordon Blue! :)
Friday, February 26, 2010
More Awesome Chili Mac
Just when you thought that Chili Mac couldn't get any more awesome, IT JUST DID!
So...
You Need:
1 box of Mac and Cheese
1/4 cup of butter
1/4 cup of milk
1 can of Chili
Shredded cheese
Sour cream
Red pepper flakes (optional)
1. Boil your water
2. Add the noodles and cook per the directions on the box (I did 8 minutes)
2.5. (Optional step) Add salt, I find that it helps the noodles from sticking together too bad, and it also helps the noodles from sticking to the bottom of the pan.
3. Drain the noodles
4. Melt the butter in the bottom of your pan (again, I find that it helps the noodles from sticking to the bottom of the pan so bad)
5. Add the noodles back into the pan
6. Add the milk
7. Add the cheese sauce
8. Stir together
9. Add a huge handful of shredded cheese
10. Stir the cheese and noodles together
11. Dump in your can of chili and stir together
12. Let the chili heat up for a few minutes.
12.5. Add a few red pepper flakes for a bit of a kick if you want
13. Dish up
14. Add a dollop of sour cream and top with a tad bit more cheese
15. NOM UP AND ENJOY!

The ingredients Noodles bubbling away
 Draining the noodles
 The butter melting
 Mixing together the butter and noodles
 Mixing together butter, milk, and noodles
 Mixing in the cheese
 Cheese all mixed together
 Adding in the shredded cheese
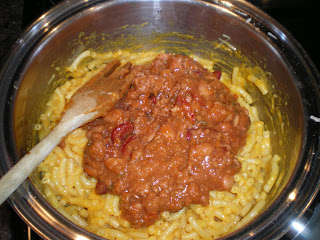 Adding the chili
 Stirring everything together

Mixing in the red pepper flakes
 READY TO NOM UP!
 Clearly, it was very good!
ENJOY!
Happy eating!
Till the next time!
So...
You Need:
1 box of Mac and Cheese
1/4 cup of butter
1/4 cup of milk
1 can of Chili
Shredded cheese
Sour cream
Red pepper flakes (optional)
1. Boil your water
2. Add the noodles and cook per the directions on the box (I did 8 minutes)
2.5. (Optional step) Add salt, I find that it helps the noodles from sticking together too bad, and it also helps the noodles from sticking to the bottom of the pan.
3. Drain the noodles
4. Melt the butter in the bottom of your pan (again, I find that it helps the noodles from sticking to the bottom of the pan so bad)
5. Add the noodles back into the pan
6. Add the milk
7. Add the cheese sauce
8. Stir together
9. Add a huge handful of shredded cheese
10. Stir the cheese and noodles together
11. Dump in your can of chili and stir together
12. Let the chili heat up for a few minutes.
12.5. Add a few red pepper flakes for a bit of a kick if you want
13. Dish up
14. Add a dollop of sour cream and top with a tad bit more cheese
15. NOM UP AND ENJOY!
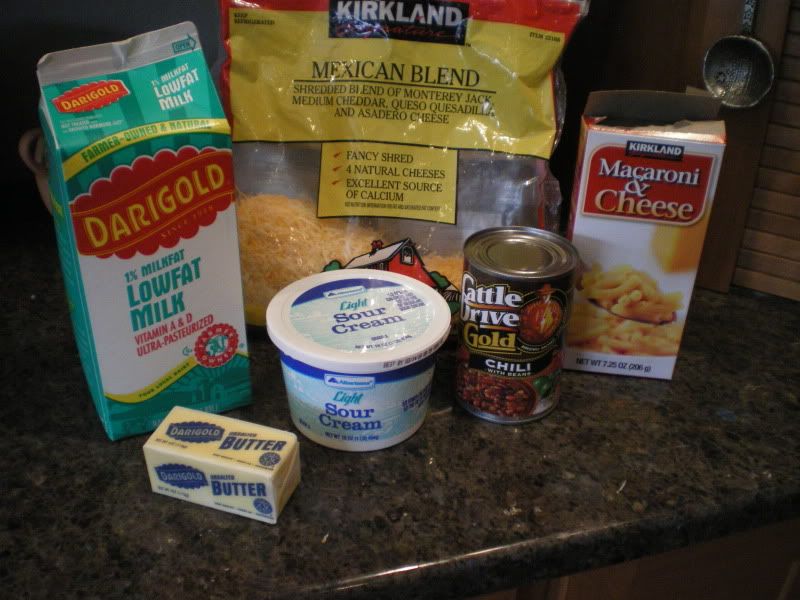
The ingredients
 Noodles bubbling away
 Draining the noodles
 The butter melting
 Mixing together the butter and noodles
 Mixing together butter, milk, and noodles
 Mixing in the cheese
 Cheese all mixed together
 Adding in the shredded cheese
 Adding the chili
 Stirring everything together
Mixing in the red pepper flakes
 READY TO NOM UP!
 Clearly, it was very good!
ENJOY!
Happy eating!
Till the next time!
Friday, January 29, 2010
Not Your Average BLT
So, I like a good sandwich every now and again. Subway is a weakness. OMM is that place GOOD! But yesterday, I was hungry for a BLT, and well, this is what I came up with.
You Need:
2 slices of good wheat bread
1 piece of cheddar cheese
A couple of slices of deli ham
4 slices of microwave bacon
5 cherry or grape tomatoes sliced in half, length wise, not width wise
A few onion slices
A handful of spinach
Ranch dressing
Dried oregano
Dried basil
Salt
Pepper
Small frying pan
Spatula
Knife
1. Heat the frying pan over medium heat
2. Butter one piece of bread and lay it in the pan. Add your cheese and ham and top with the other slice of bread.
3. Butter the top piece of bread.
4. Let the first side cook for a bit and then flip
5. Let the other side cook for a few minutes, and remove from the pan
6. Add some EVOO to your pan and add the onions. Let cook till translucent.
7. Cook the bacon in the microwave according to the directions on the box
8. Place on top of the ham
9. Add the onions on top of the bacon
10. Add the tomatoes on top of the onions
11. Add the spinach
12. Add the ranch
13. Shake on some salt, pepper, oregano, and basil
14. Close the sandwich and slice to your preference
15. ENJOY!
It's really good paired with some wheat crackers and a Diet Dr Pepper (which, is what I paired it with. LOL)
Enjoy y'all!

I know it doesn't look real pretty. But it's SO GOOD!
Enjoy! :)
Till next time,
Happy Eating!
Monday, January 18, 2010
Vanilla Cinnamon Coffee
Ok, so it's been forever and a day since I've updated this. My apologies. Things have been interesting around here, and I haven't had any new recipes for a long while. Unfortunately, I have no pictures for this one. But it's my favorite way to drink coffee, especially if I don't have any of the flavored creamer stuff, and this is way cheaper too. Especially since most of the ingredients are just hanging around in your pantries.
So...He is the recipe!
You Need:
Coffee
Milk or Cream (but if you want to use non-dairy creamer, go right ahead, but it tastes better with milk or cream)
Vanilla extract
Cinnamon
Splenda or your preferred sweetener
What you do:
1.Pour yourself a cup of coffee
2. Add just a little bit of your dairy product
3. Add a cap full of vanilla into the coffee
4. Add the amount of sweetener you like, I usually add 2 packets of Splenda
5. Add just a pinch of cinnamon, not too much, otherwise it'll overpower the drink.
6. Stir together
7. Enjoy!
Note that this drink can be enjoyed hot or cold, if you want it cold, just pour over ice!
Until next time,
Happy Eating!
Wednesday, June 10, 2009
In Honor of a New "Top Chef"...

So, in honor of a new "Top Chef" on tonight, I thought i'd blog about my Top Chef: Emporia experience. And what an experience it was.
First off, it started with me climbing the stairs on a Monday morning to my Mass Comm. class and seeing a flier on the wall, announcing a Quickfire challenge in the Union that afternoon. I think, why the hell not? So I go about my day and was going through the Union a little later in the afternoon. I see the table set up, and I was like, Oh yeah! I'm gonna do that! So the challenge? To smell and identify20 herbs and spices. Just smell and look at herbs and spices. That was a lot of fun. So, I hand my sheet into the people and I wait.
So, a couple of days later, I get this e-mail that says i'm 1 of 6 people in the finals! So a few days later, we meet with the people putting it on, the UAC and Sudexo. We learned that we were doing a pasta challenge, and we have 45 minutes to put together our pasta with one secret ingredient that we can bring. My choice secret ingredient? Tomato Sauce. That's right. Tomato Sauce. My pasta that I made? Pizza Pasta! (See the recipe in one of the first posts).
So, a few days after this is "Game Day". We met up in the Union at like 7 or something like that. We got to walk around the space and see our stations. We had a Bounty table that we could go back and forth to. I ended up using sausage, hamburger, spaghettie, olives, mushrooms, basil, orangeno, garlic, toamotes, and a bunch of cheese. And I think that was it. So we all had 45 minutes to cook. The pasta was all pre-cooked so that was nice, as was the meat. That way we didn't have to worry about that. So basically I cooked my sauce first and then heated up my pasta and then mixed the two together. And then plated and served.
I'm not sure how I ended up against everyone, but I know I had A LOT of fun.
So here's a couple of pictures


And that's my Top Chef experience!
Till the next time,
Happy Eating!
Sunday, May 31, 2009
"Chickty China and the Chinese Chicken, Have Drumstick and your Brain Starts Tickin'"
Love that song! And it kind of applies to today's entry, in which we go around the world once again, this time to China!
I present to you: Chicken and Broccoli
So I've made this recipe numerous times now. And it's one of the few ways I get myself to eat broccoli, because broccoli is not my favorite vegetable. But I love this, and I also pair it with fried rice, which I actually took the recipe from foodnetwork.com and adapted it to fit my own needs. And you know those sugar biscuits you get at Chinese buffets? I'll show you how to make those too. So lets get started! And my appologies, I don't have any pictures for this entry, seeing as when I made it last, I didn't know that I would be needing to take pictures of it. So here we go.
Chicken and Broccoli
You Need:
1 bunch of broccoli
1 package of chicken tender breasts
1 bottle of La Choy Garlic Ginger sauce (if there's an off brand avaliable, feel free to use that)
1 tablespoon of peanut butter
1. Bring some water to a boil in a medium sized pot. Cut up your broccoli.
2. Cook your broccoli uncovered for 3 minutes. Drain and rinse.
3. In a medium sized skillet, heat some EVOO over medium heat.
4. Cut up your chicken and cook till it's done.
5. In the same pan, add your broccoli and your sauce (use half the bottle if it's 1-3 people, the whole bottle if it's more than 3) and your peanut butter. Stir together and let simmer on low heat till thick.
6. Serve and ENJOY!
Fried Rice
You Need:
1 package of brown rice
1 bunch of green onions
1 medium sized onion
1 package of frozen peas and carrots (if you can't find it, use a bag of baby carrots and frozen peas)
2 eggs
Garlic
Ginger
Salt
Pepper
Soy Sauce
1. Cook the rice according to the directions on the package, and then stick in the fridge for a couple of hours to overnight. Get it nice and cold. I like to cook my rice with chicken broth, but if you perfer water go right ahead.
2. In a medium sized skillet heat up some oil. Put in your garlic and ginger. I wouldn't recommend putting more than 5 or 6 cloves of garlic in, and just a tablespoon or so of ginger. Cook till they become fragrent, and then transfer to a bowl.
3. Put in more oil and put in your green onions and your onion (if you're making it for just a few people, use 3-4 pieces of your green onion and only half of your onion) cook untill fragrent and put in the bowl with your garlic and ginger.
4. Again, put in oil (I use EVOO) in the pan and cook your carrots and peas (I usually cut my carrots into small rounds, but if you want to go even smaller, go right ahead) untill the frost goes away on the peas and they just barely begin to go soft. Transfer to the bowl with the other ingredients.
5. Crack your eggs into a bowl and wish them together. Add the salt and pepper and add more oil to the pan. Pour into the pan and start scrambling till their cooked, but not set all the way, so there will still be some liquid stuff left. Transfer into the bowl with the other ingredients.
6. Add a little bit more oil and the rice into the pan and then cook till it gets heated through. Add the other ingredients and mix till well combined. Add your soy sauce at this point, don't add too much, otherwise it'll taste like soy sauce.
7. Serve and ENJOY!
And last but not least:
Sugar Buscuits
You Need:
1 can of plain buiscuits
1 cup or so of sugar
Butter
1. Heat a medium sized pan over medium heat, add your butter and wait till its melted.
2. Put a buiscuit in the pan and cook for a few seconds on one side and then flip and cook for a few seconds on the other, continue doing this, with a few seconds on each side, till the buiscuit is cooked.
3. Roll in sugar and put on a plate.
4. Repeat steps 2 and 3 for the remaining buiscuits
5. Serve and ENJOY!
And that ladies and gentlefolk, is one tasty Asian meal. You can use a sugar subsitute, like Splenda, if you want for the busicuits, but I reccommend using regular sugar. Hope you guys enjoy this as much as I do! :)
Till the next time,
Happy Eating!
Subscribe to:
Posts (Atom)
